How It Was Shot: March Mosaic'ness
In my recent post "March Mosaic'ness", I wrote a detailed backstory and build list for two very special custom builds here in Toronto. Check it out here. As a follow on and in support of that post, I'm writing this behind the scenes explanation focused on the locations, gear, and lighting setups I used to complete the project.
Why? Write ups like this have been incredibly helpful to me in my growth as a photographer. They help me understand how others shape and manipulate light, to learn new techniques, and give me the motivation to experiment.
Hopefully this write up is me paying it forward. Let me know if you'd like to see more of these behind the scenes.
on the court
On location for March Mosaic'ness
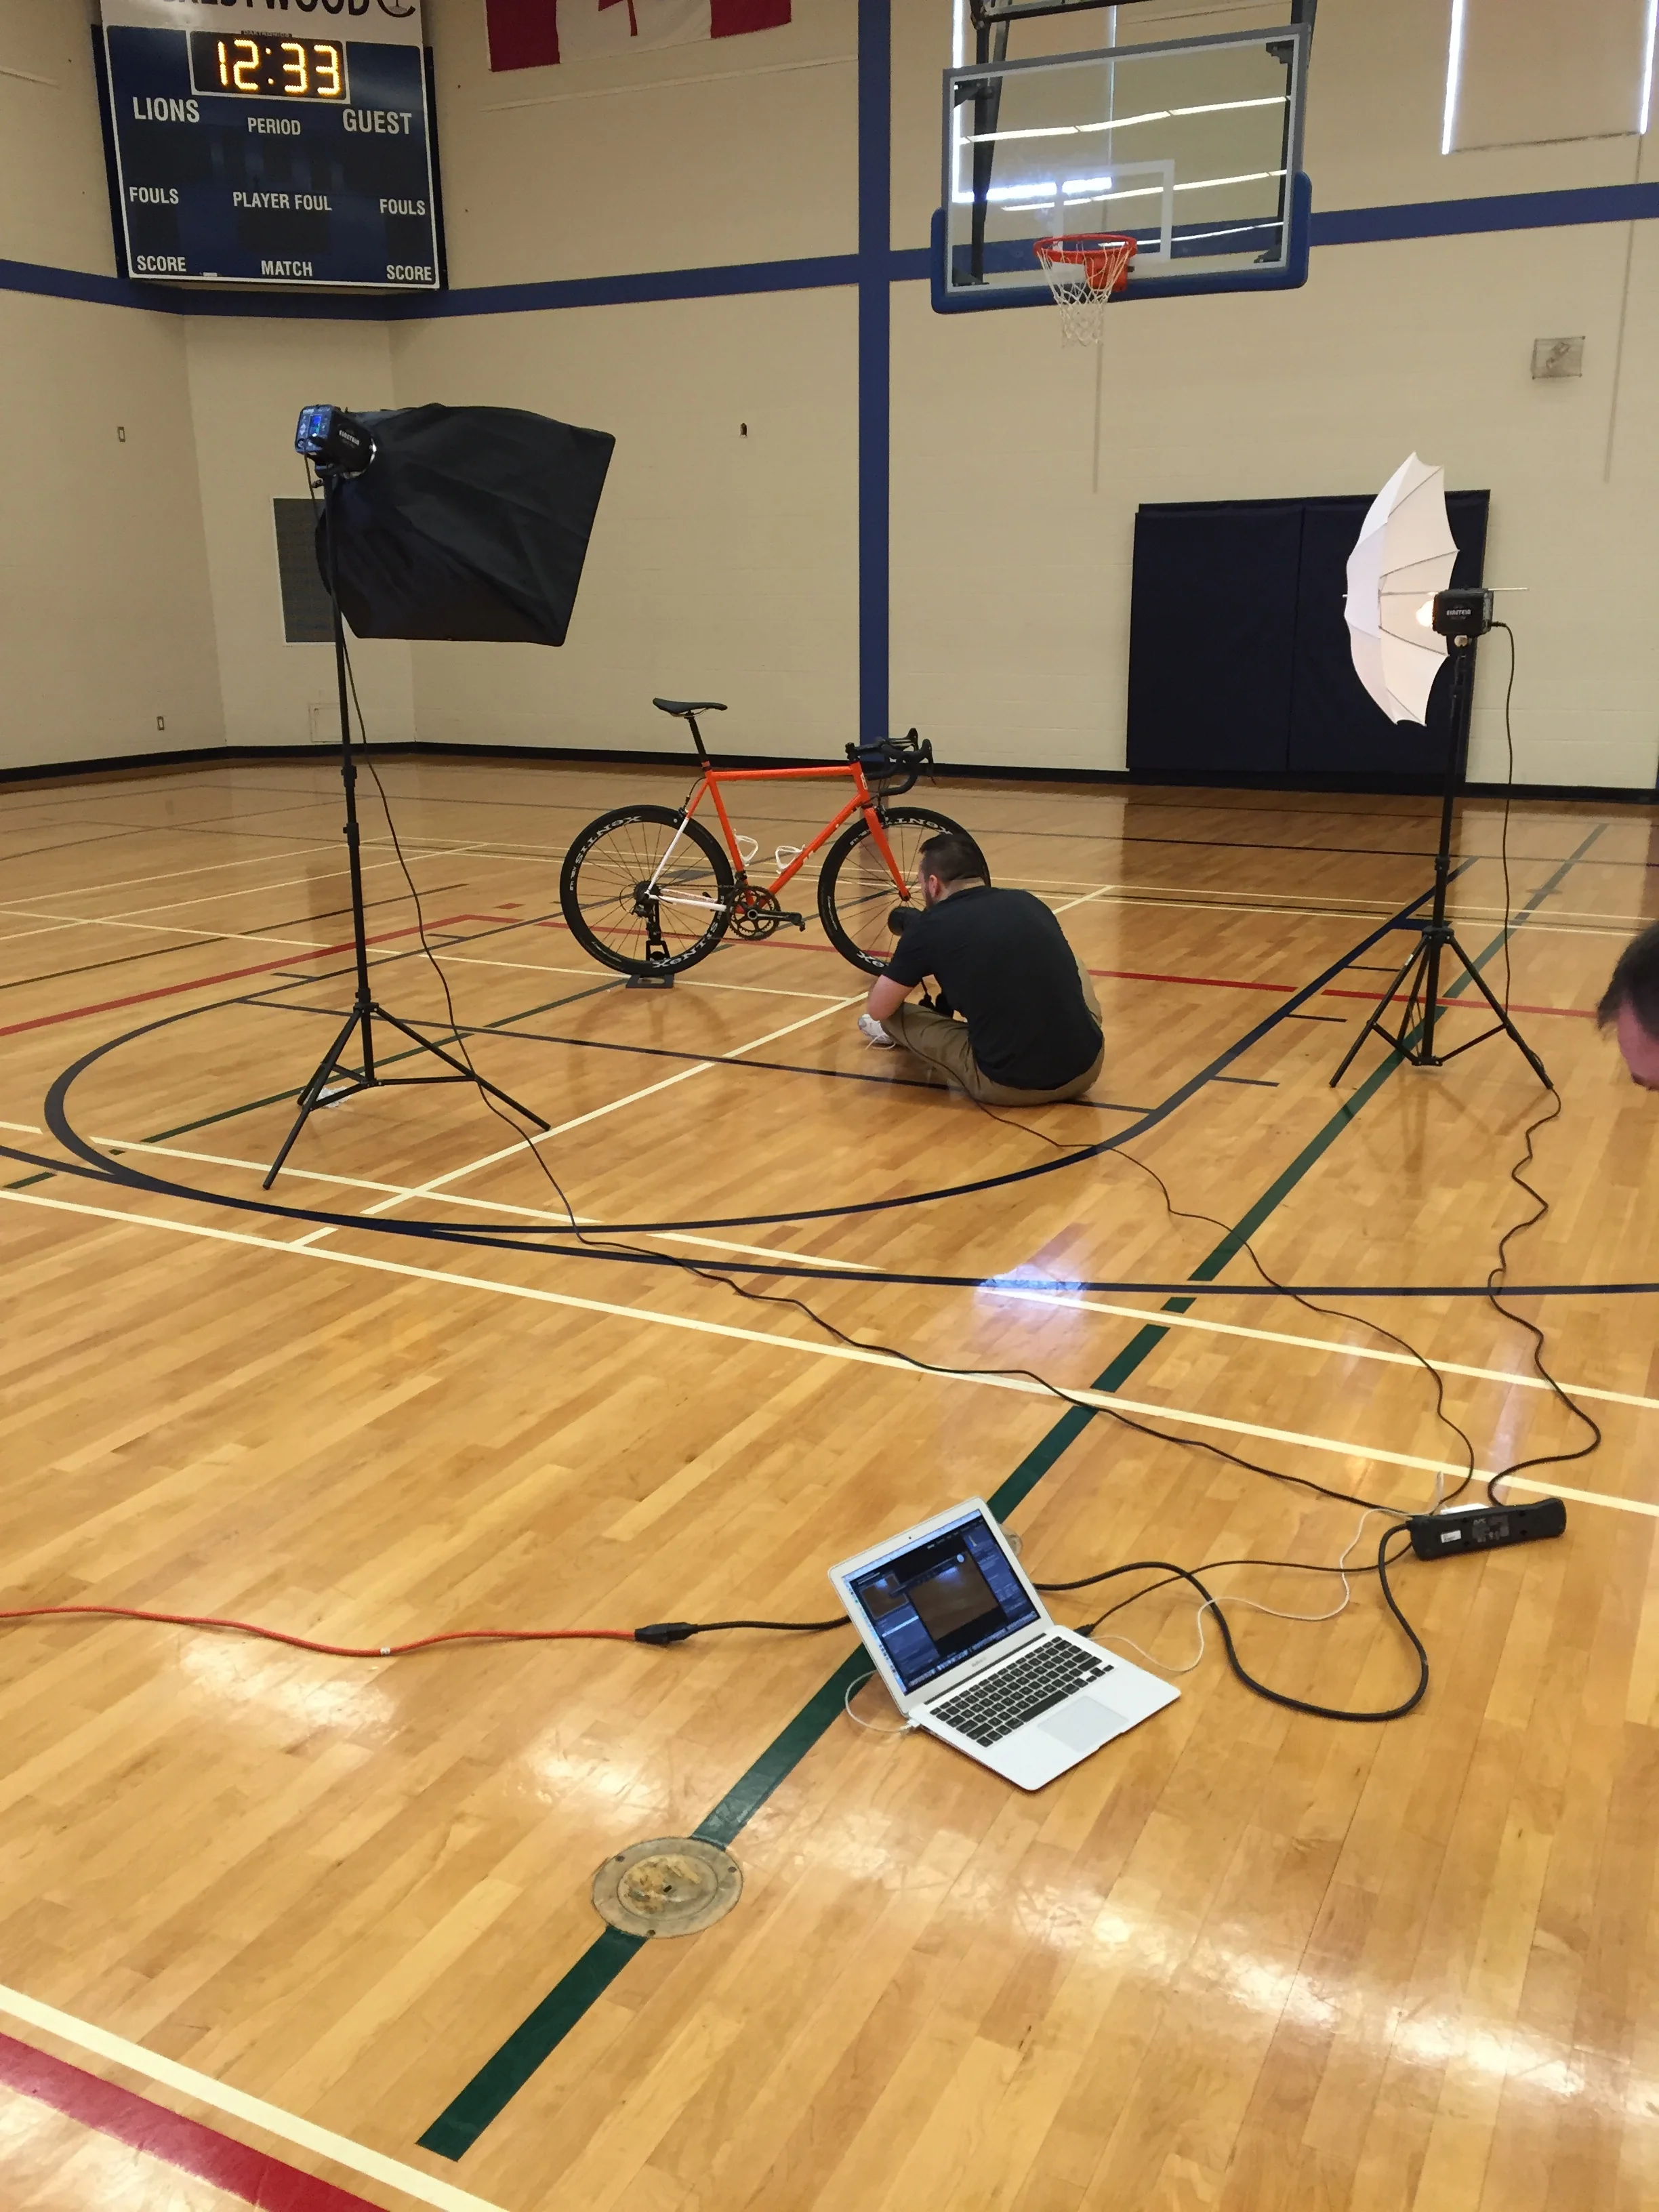
With the help of a good friend and some incredibly accommodating subjects, we shot this project over two days and in two locations. The first day was on location at Crestwood Prep School in Toronto. Location makes a big difference to the feeling of a photograph by adding context. However it does also present unique challenges to deal with. Here is what I did about it.
Ambient lighting: Unlike the studio, a gymnasium is large, open, and full of uncontrolled light coming from varying sources. This gym was equipped with commercial overhead lighting that fills much of the court, but unevenly. There are also windows in the gym that add natural sunlight to the mix. So now we've got two different lighting temperatures at two different outputs... and it's uneven. You can see that we drew the shades over the exterior windows as best we could.
Physical Location: In the photo here you can also see some of the location features I needed to work around. Behind the glass backboard there is a large dark blue pad on the wall. This creates a problem as a backdrop to the bike as it casts a dark distracting reflection along the floor. The other walls had stages, main access doors, or folded up bleachers which eliminated them as options too. The back corner offered plenty of wood floor and a scoreboard for context. It also had clean walls for less distraction away from the main subject, the bikes. It does have a large air vent on the wall but masking this out of the final images would be easier.
Metering: To get my final exposure settings I started by setting a balanced exposure to the ambient light in the room. This was important because the gym setting was key for context and I wanted it to be part of the setting. One thing to note is that because I was going to be adding a subject into the frame, I set my exposure based on a shallower depth of field. This was deep enough to cover the detail of the bike but also help isolate it from the background. Finally I set my key and fill lights on the bike.
Setup: Because of the size of the room and the variable light sources, I needed to design a light setup that would not only showcase the bike in the surrounding scene but also fill in the uneven darker spots left from the overhead lighting. One rule of thumb I stick to is, keeping it simple. For this I chose a 3 light setup starting with a key light and fill light in a cross light arrangement. Each were set above the subject and far enough back (~8' - 10') to keep hot spots off the floor in frame. Then I added a small strobe as a backfill off camera and pointed at the back wall where there was significant light drop off. This helped with the overall exposure and balancing the uneven ambient light.
Here is a diagram of my setup (click to open larger) and the parts list:
- 2 Einstein E640 strobes
- 1 Chimera small 24"x32" softbox for keylight
- 1 Elinchrom white shoot through umbrella
- 1 Elinchrom D-Lite RX-One
- 1 Elinchrom silver reflective umbrella
in the studio
The second day of shooting took place in my home studio to focus on complimenting detail images and a few shots of the full bike. While I prefer shooting on location for fun, the studio offers much more controlled conditions and it is much more predictable. Keeping it simple, I have a few 'go to' quick setups drawn from. For this project I chose a pretty classic setup that is used more with portraits. Why? Because I wanted to present the bikes with a sense of personality. Like you would in a portrait.
Setup: My home studio is small but ideal. I've got good space for single light setups and just enough space for two. Specifically for this project I used the key light behind and above camera slight to the left. Due to the confined space of my home studio I ran this strobe powered down to 400ws and stopped down. For balance I used a small strobe off camera to the right as a cross light but pointed it slight towards the backdrop to also act as a shadow fill. This was set about level with the bike. To the left and between the bike and backdrop I used a white reflector propped up at ground level to help fill in some shadows on the ground.
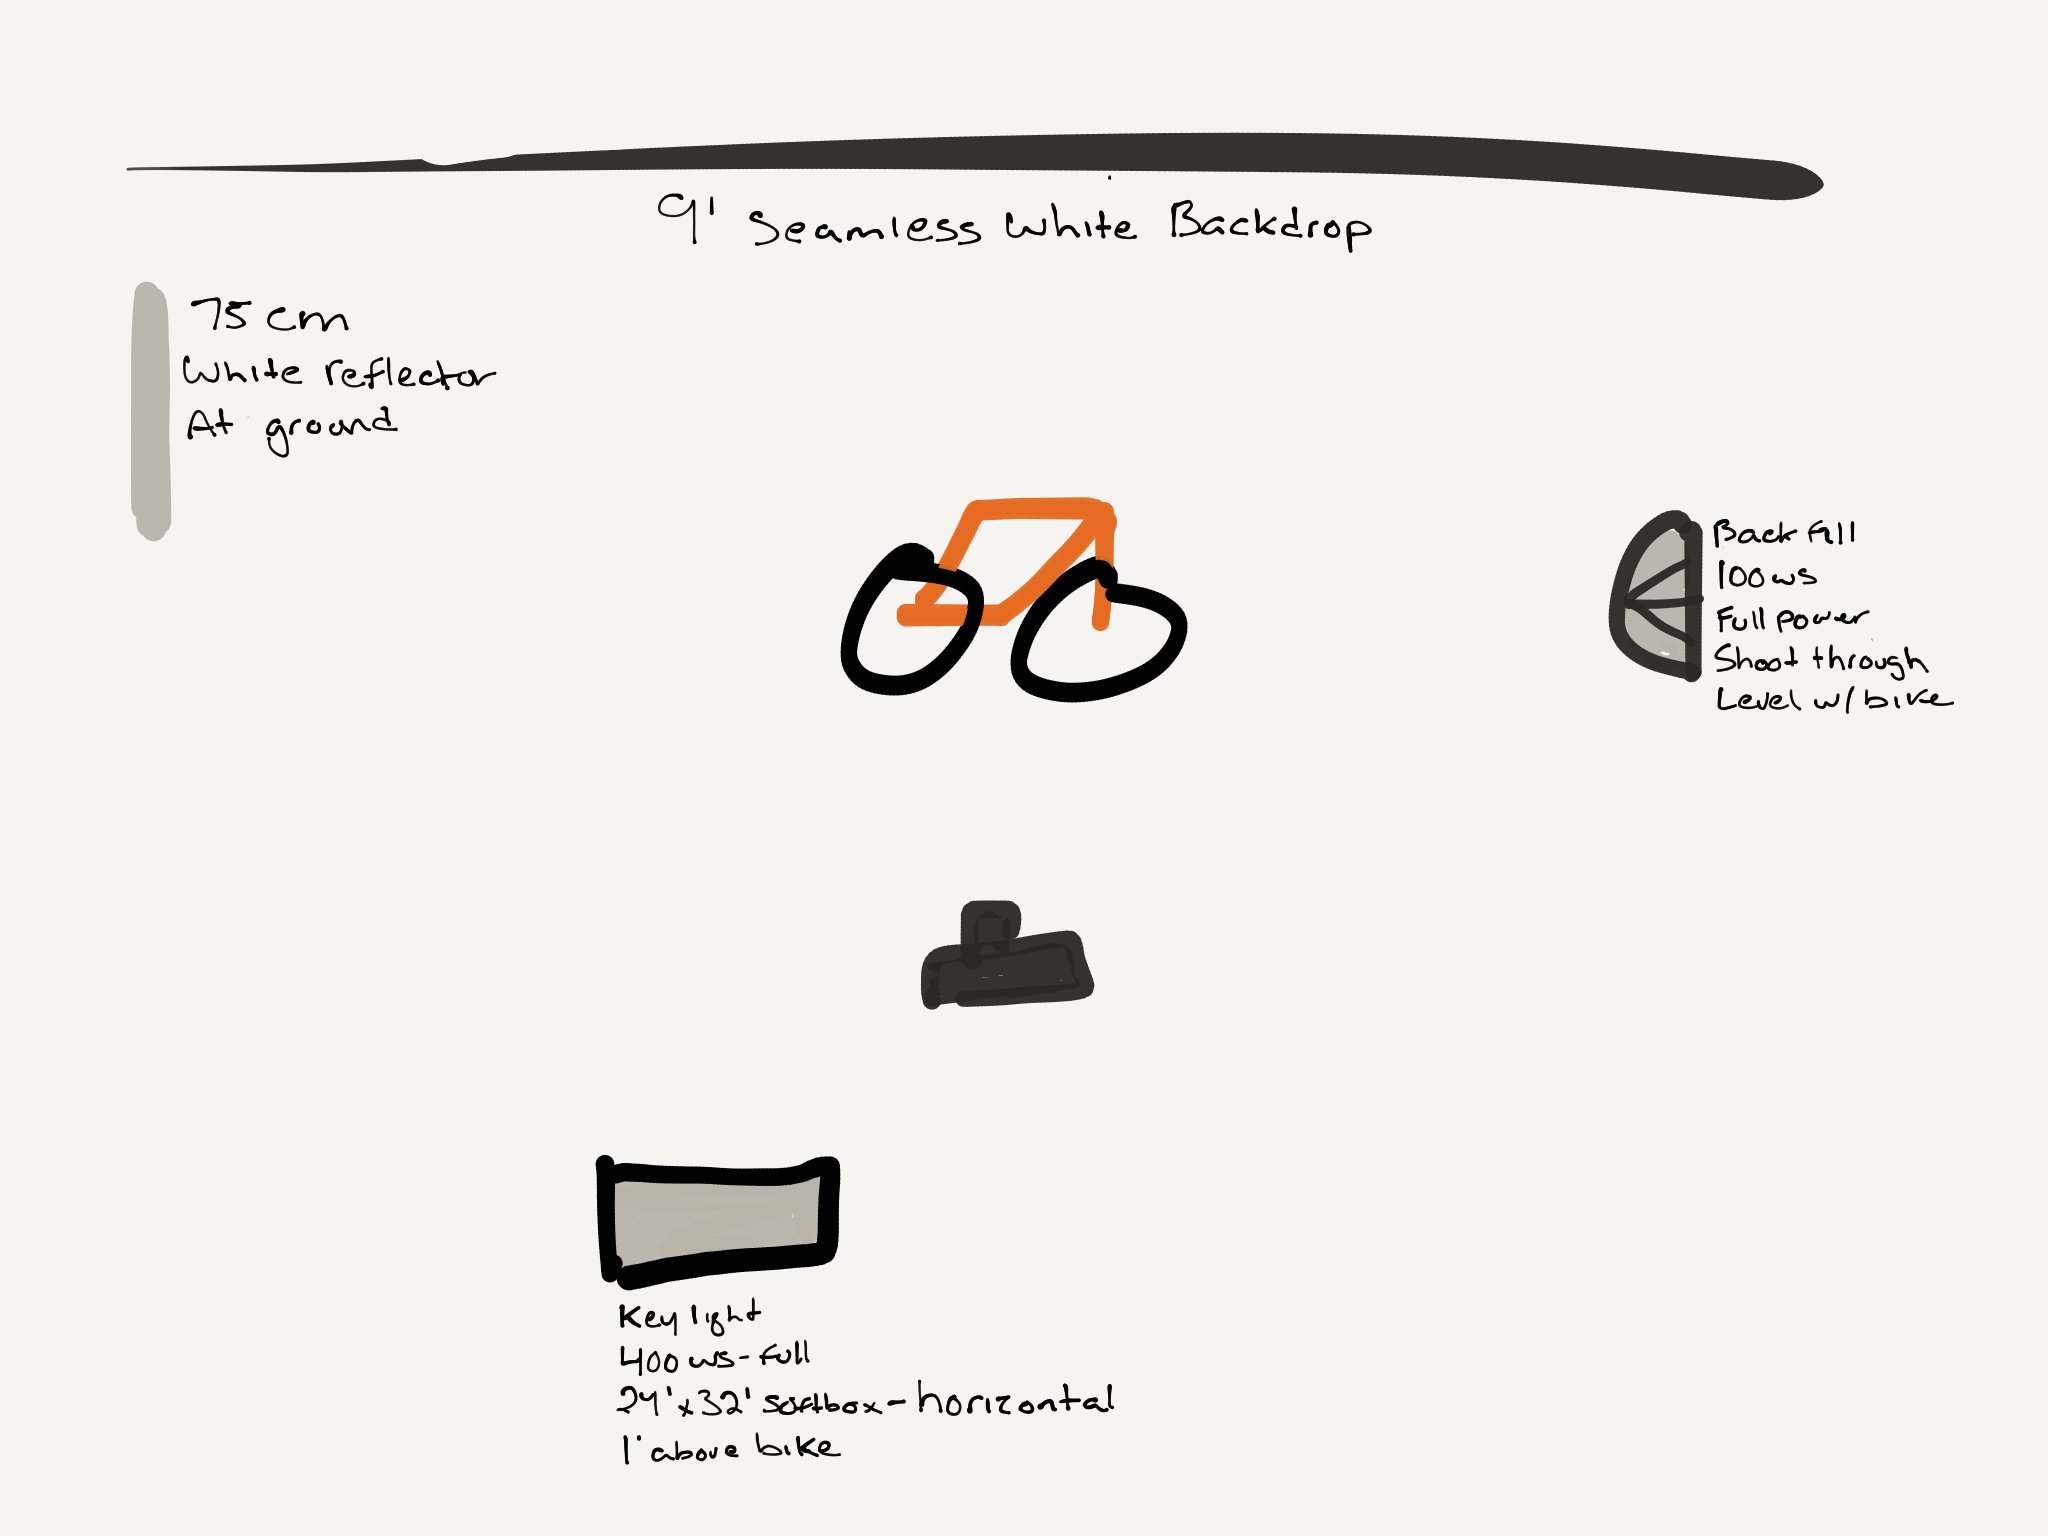
Here is a diagram of the light setup I put together in advance of the shoot and the parts list:
- 1 Einstein E640 strobe powered down to 400ws and -2stops
- 1 Chimera small 24"x32" softbox for keylight
- 1 Elinchrom white shoot through umbrella
- 1 Elinchrom D-Lite RX-One strobe
- 1 Elinchrom silver reflective umbrella
There you have it. That's how I shot the March Mosaic'ness project. Hope you enjoyed this behind the scenes writeup. If you'd like to see more of these let me know in the comments section below.
A big thanks to Blacksmith Cycle for project management, Crestwood Prep School for the location, ZeroThree Studios for equipment support, and especially to Eryn S & Paul K for letting me shoot their bikes.


